Thursday 9 April 2015

Saddled with discomfort part II

In our aim to continue to provide the best advice and fitting service that we are able to it is a pleasure to announce that, in conjunction with the 30+ other shapes of saddle we have to test at fit-me-up, we have now added the Selle Italia range.

In addition to our pressure mapping system the Selle Italia saddles are recommended based on their 'idmatch' system.

The 'idmatch' system allows for some basic measurements to be taken and then an saddle shape recommended.

The difference at fit-me-up is our pressure mapping system that is able to then further check the likely suitability of the saddle. 

The 'idmatch' system uses a series of tools to take the measurements.


The measurements are then fed through a system that recommends a shape and type of saddle.

The 'General Parameters' used in the system are;

  • Age
  • Height
  • Weight
  • Gender
  • Type of Cycling
These are used to help identify the cyclist's overall size and gain an idea of their general needs.

Next the 'intertrochanteric' distance is measured. 

The aim of this is to gain an idea of the distance between the 'ischial tuberosities'. These are the 'sit bones' that are sometimes measured by sitting on a box.

While this can act as a guide, the next two steps are where the system starts to distinguish itself.

First the 'thigh circumference' is measured, this will help riders with larger thighs be matched to saddles that facilitate them sitting on the part of the saddle deigned by the manufacturer to be sat upon.

Conversely, a rider with smaller thighs can be offered the correct support from a potentially slightly broader saddle.

The next part of the saddle selection system looks at the Cyclists' 'pelvic rotation'. An 'inclinometer' is supplied with the system to help measure this.

The aim here is to match most ideal level of support under the pelvis depending on the degree of rotation that is likely to be achieved when on the bike. Undue pressure here is never nice...

Based upon this information a selection of saddles will be recommended by the system.
The recommendation will be based on parameters and saddles available.


The most appropriate saddle can then be selected to be tested using our pressure mapping system

Where the idmatch system goes further with the use of their 'biomechanical reference point'.
The aim here is to set the saddle in the correct place on the bike, something as a fitter I like the idea and am looking forward to testing.


Any questions please ask

Contact us here

Happy Miles


Saturday 8 November 2014

The right bike for you..?

After going through the physical part of the pre-ride assessment, it all too often becomes evident that the bike is just not the right bike for the rider's current physical condition.

It may well be the right size and the right type (road versus mountain for example), but the frame geometry is just not right.

In the past few years more and more manufacturers have addressed this with different geometry bikes.

One such example is Trek who offer for example the Madone in more than one geometry. 

The two images below from Trek's Site show how the 'H1' is created for the rider with a greater ability to rotate the pelvis and maintain stability through stronger core muscles.


The 'H2' for example comes with a higher head tube to facilitate less stress on the riders lower back and neck, allowing a more upright view of the road ahead.


This is a great way to offer similar ride characteristics to riders with differing needs. Another way of achieving the same goal is to offer two similar bikes with subtly different geometry.

For example Giant offer the Defy Advanced and the TCR Advanced at similar price points, but the two differ in stack and reach geometry for example.

The Defy has a 'Stack' of 58.5cm and 'Reach' of 38.1cm compared with the TCR having a lower 'Stack' of 56.6cm and a longer 'Reach' of 39.1cm (based on size m/l 53.5) making it a longer and lower frame.

It would follow that a less physically flexible cyclist would benefit from the geometry of the Defy, but things are not always that simple.

These two simple examples from large manufacturers show there can be much more to selecting the right bike than the size.

To help cyclists through this we carry out a history and physical examination before getting on the bike to help in understanding the needs of the cyclist.


I can 'touch my toes' does that make the 'H1' or the TCR better for me?


In some cases yes, but not always. 
One of the key factors in understanding movement is looking at where the body it comes from. 
For example very long hamstrings and a tight, stiff lower back will not make the reach to the handle bars on a bike any easier for the cyclist.

Using 'the Physio Bike Fit' process, we can assess which bike in your favoured brand is the most likely to help you to obtain your goals.

We can do this before you purchase your bike using the Waterford Fitmaster helping your choice and selection of bike, the Fitmaster is highly adjustable to mimic the geometry of available frames.


As part of the process we can also offer live Saddle Pressure Monitoring with over 35 different shapes of saddle in the studio to help you find your fit.

Any questions please ask

Contact us here

Happy Miles


Thursday 6 November 2014

Stack and Reach - How does it help me?

While not all bike sizes are equal or even equally named, certain measurements can be used as a constant.

In the two examples below, the size 'M' is a '50' in the upper and '54' in the lower table.


SIZEHEAD ANGLESEAT ANGLETOP TUBEREACHHEAD TUBESTACKCHAIN STAYWHEEL BASESTANDOVER HEIGHT
cmDegreesDegreescmcmcmcmcmcmcm
XS (43.0)70.575.051.536.613.553.042.099.867.5
S (46.5)72.074.552.537.215.055.042.099.070.2
M (50.0)72.074.054.037.717.056.742.0100.073.0


SIZEHEAD ANGLESEAT ANGLETOP TUBEREACHHEAD TUBESTACKCHAIN STAYWHEEL BASESTANDOVER HEIGHT
cmDegreesDegreescmcmcmcmcmcmcm
S (50.0)73.075.0/78.051.340.211.051.040.598.276.2
M (52.0)73.075.0/78.052.941.713.053.040.5100.178.5
L (54.0)73.075.0/78.054.643.015.054.940.5101.980.5
While this does not show us much, the more 'eagle eyed' will have perhaps spotted the upper table is road bike geometry and the lower is TT bike, the 'Stack' and 'Reach' columns will help a great deal.

Keeping with the size 'M', the 'Stack' and 'Reach' numbers are;

Top Table 56.7cm Stack and 37.7cm Reach

Lower Table 53.0cm Stack and 41.7cm Reach

Looking at these numbers shows a much more obvious difference.

So where are 'Stack' and 'Reach' measured from?


The frame 'stack' is the vertical distance from the centre of the bottom bracket to the top of the head tube on the bike frame.

The frame 'reach' is the horizontal distance from the centre of the bottom bracket to the top of the head tube on the bike frame (see above image)

With our current example the 'M' size bike from the first table will be taller with a shorter distance to the bars than the second 'M' which will be lower with a greater distance to the bars.

How does this help you?

Well, simply with these numbers and the seat and head tube angles we can use the studio 'Fitmaster' to replicate the geometry of a given bike to check that it will fit you.


The seat tube angle is a key component to this as it will define where the saddle can be placed in space and show the limitations of adjust ability for a given frame size.

The more vertical (closer to 90) angles in the lower table will allow the Hip angle of the Cyclist to open more facilitating an easier TT position than the less vertical Road bike angles.

From another perspective, a 'long and low' bike will not be comfortable or suitable for the Cyclist with flexibility issues...

As all our Bike Fits follow 'The Physio Bike Fit process' we can help you find the right bike and the right size bike for you.


Any further questions please get in touch and ask away.

Stay safe and Happy Miles


Thursday 9 October 2014

Power is nothing without control...

Power is nothing without control, so the Pirelli advertising slogan goes...

How about 'flexibility is nothing without control'?

When assessing Riders in the studio flexibility is often a notable obstacle to a comfortable and efficient bike fit.

That coupled with common asymmetries can cause the Rider issues in achieving his or her desired cycling goals.

So what does this mean, an aggressive regimen of forced stretching of muscles and tissues with the aim of 'willowy' flexibility, in a 'no pain no gain' style assault on the task in hand.

Well ideally no.

Flexibility is great and certainly a useful attribute to us all, not least those riding a bike, but flexibility on it's own is not the aim.

Having the body control to sustain a comfortable and efficient position is also very important. Without the control there is an ever present possibility of over stretching and causing injury to the joint or other structures.

When stretching posture is very important.

Being able to touch your toes when standing is a perhaps an indicator of flexibility, but without considering if all the structures in the chain that are being stretched are moving as they should, repeating this activity will just lead to the flexible structures getting more flexible and the tight structures at best simply staying tight - ultimately leading to injury.

Perhaps consider that the chain is only as good as it's weakest link.

When fitting a bike to the rider, the comfortable position that is able to be maintained is more important that the ideal numbers for joint angle to a point. The ideas are a great guide for reduction of injury and can provide an aim for the rider, but comfort is the key.

The same is true for stretching, being comfortable and sustaining a good posture is key for continued improvement and consistent gains both off and on the bike.

Good position when working through the degrees of (almost) inevitable asymmetry is hugely important. Often I find the dominant side of the rider is a little tighter than the contralateral side. In many case this leads to a less efficient and potentially injurious movement on that less dominant side.

Care is then also required when stretching to pursue balance where possible.

Some simple self tests will highlight your own asymmetry and if you are seated reading this have a thought about your posture...

until next time, thanks for reading and happy miles.

fit-me-up


Tuesday 7 October 2014

It is getting colder, but is finger numbness just due to the weather..?

It is getting colder, but is finger numbness just due to the weather..?


Increasingly I am asked about wrist pain or finger numbness and ‘pins and needles’ sensation in the fingers and hands. If we get the obvious out of the way first…

 As more of us spend greater amounts of time at our desks accomplishing tasks requiring our attention, we can neglect our postures.

 Specifically that of our backs, which can lead to a visual ‘rounding’ of the shoulders is viewed from the side.

 When sitting on the bike this posture alteration can transfer on to the bike and lead to excessive extension of the spine at the neck, which can cause a whole set of issues including hand and finger numbness, pain and pins & needles sensation.

 Wrist position examples

 With the help of the Studio Skeleton ‘Rodney’ we can demonstrate some simple wrist positions. 

This example shows a ‘neutral’ position for the wrist and the likely distribution of force along the line of the limb rather than creating a specific point of pressure and potential injury. 

This will encourage a more comfortable position allowing most of the road buzz and bumps to be attenuated through the elbows, reducing the risk of injury at the wrist.

Comfort is key here, on longer rides and rides over rougher ground the wrist position will become more critical.


The position here shows the wrist is bent down from the thumb. This can often result in increased pressure in the direction of the arrow, together with discomfort, numbness and injury.


This is often the case when the hoods are rotated back towards the rider, though alteration in isolation can lead to other issues as it can change the position of the rider on the saddle.


In this example the wrist is angled downwards, the opposite to the image above. The resulting pressure is the again transferred into the wrist joint rather than dissipated along the limb, perhaps with some flex at the elbow joint.

This can often be the result of having to over reach for the hoods on bar.

Both the second two examples will load the wrist and make it less comfortable and more difficult to handle the bikes, particularly over rougher ground.


Hand size is worth a mention too, for ladies and smaller riders who may have problems holding the hoods and still being able to exert sufficient pressure on the brake levers in the event of needing to stop quickly. Whilst a one size fits all type solution is provided here more than at any other part of the bike, it is worth considering different manufacturers offering before purchase.

In addition to the wrist specific issues dealt with above, hand position can have further reaching (sorry!) implications for weight transfer.

For example, if you are transferring too much or too little body weight through your hands it will adversely alter the handling of your and make it awkward to turn or ‘skittish’.

A common cause of too much weight on the hands is the tilting of the saddle nose down. An upward tilt will have the opposite effect, but that will generally be the least of your concerns due to the forced spinal position this often creates.

Gloves.

While some riders prefer fingerless and some prefer a full finger glove the importance of both feeling and ,in the UK at least, warmth. As with other items of clothing that require the fit to aid comfort, trying for size is important. If your gloves are not comfortable and offering the right amount of padding for you in the right place for you, you will alter your hand position. This is not immediately terrible as we all move hand position while riding, but when we choose to and not out of discomfort distraction.

Remember any change in isolation will lead to alterations elsewhere in your position.

Happy Miles

Fit Me Up

Thursday 25 September 2014

Saddled with discomfort..?

Saddle contact area discomfort is way too common a reason for Cyclists and Triathletes picking up the phone or sending an email to me.

Although there are may different causes for the discomfort which varies from examples including;
  • The wrong size bike
  • The Saddle to high
  • Poor cleat placement
  • Previous injury
  • Asymmetric muscle tightness
  • Overuse 

Once the root cause of the discomfort is ascertained it often follows that the Athlete falls into one of two broad camps.

I have not attached a label to either of these as I don't believe that this would be helpful, rather consider the question; 

"Do you sit on your bike in a position dictated to you by your saddle or do you sit on your bike how suits you which leads to you perching on an uncomfortable part of your saddle?"

On testing this here in the studio, there is no apparent specific pattern for this, excluding the athlete who is so lacking in flexibility that their on bike position is almost fixed due to their rigid lumbar spine for example. 

The less flexible athlete is presented with the choice of settling for an 'accommodative fit' or working towards more optimum fit with some remedial exercises. The choice will often depend on the time to the next race or sportive and the time that that athlete feels they have to work with when not riding their bike.

Returning to the saddle contact, from personal experience I find that I will get my contact with the saddle right first and then deal with everything else. By this I mean to say if I need to ride a borrowed or hired bike that is not my normal choice, the contact with the saddle will dictate my overall position, so it is very important.

This leads to a comfortable contact but can cause shoulder and neck pain for example in a spin class.

The converse of this is another rider who I watch sitting on his bike in virtually the same position irrespective of the saddle (within reason) but sitting on a less than ideal part of the saddle.

Whilst in the short term, this will just lead to reduced comfort in the contact point it will lead to a greater stress being placed on other contact points and joints as effort is shifted around the body to reduce the saddle point discomfort.

So, this brings us back to the same point; 

If the saddle is not comfortable it does not matter what the cause is, it needs fixing.

What is the best fix?
With experience the simplest solution is often a great place to start. By checking the overall fit of bike, after taking of a history and physical examination, if the saddle can be placed in a position that will be instantly more comfortable then great.

However, as it is not always easy to tell if the saddle contact feels better we make use of saddle pressure monitoring.

This allows a pre-fit measurement to be taken, the the case of the image above the image on the left, to show where the pressure is focused. In the case of this image there was discomfort centrally towards the front of the saddle. With a little alteration the second reading was recorded showing the increased distribution of pressure and reduced focus front and centre. This is represented by the image on the right, also above.

To do this we use the same system as Cervelo. The use of this system allows the improvement to be more quickly identified without the need to reproduce the athlete's pain.

If moving the bike fit around does not produce the desired option then, we can look at other saddle shapes based on the athletes needs and anatomy, we have over 30 shapes of saddle here to try.

Not all saddle issues are simple to 'fix' and can involve a combination of factors, which often include factors that are distant from the actual contact point itself.

For more information please contact me at info@fit-me-up.com


Happy Miles

Dean


Friday 19 September 2014

That awkward first post...

Over the course of carrying out hundreds of 'Bike Fits' patterns emerge and it is the responsibility of the 'Fitter' to test these and make sure that he or she is not just seeing what he or she expects to see...

With that in mind, the Cyclist's 'history' and 'physical examination' are key to the fitting process, but so is an open mind!

This thought leads me to a different starting point that the norm of the feet or the global position on the bike. Whilst the feet certainly push the pedals and the hands hold the bars steady, the pelvis offers the key to the overall fit in most cases.

A lack of Rider symmetry is often the undoing of comfort.

The reason for this?

Preferred side dominance. 
We all favour one side over the other when clipping in to the pedals on a hill or starting to push the pedals from a stationary start, this is normal and just part of what we do.

However, this creates movement patterns and more importantly for the Cyclist tension patterns in the body and the pelvis.

Ignoring all the intricate and important connective tissues in the body and focussing on the muscles, which can only pull. 

(That is a muscle can only create tension within it's length exerting force upon the points which it attaches to.)

Any residual shortening or tension will have an effect on the posture of the body and the muscles that oppose the movement. This effect will be felt both at rest and during movement.

Put simply a tight muscle on one side of a simple 'hinge type joint' like the elbow will lead to a lengthened (and often weakened) muscle on the other side of that joint. Think the Bicep and Triceps muscles around the Elbow joint in the Arm.

But what if the joint in question is much more complex than that, in this case the Hip joint and add in some 'preferred side dominance'...

The image below shows the primary flexors of the Hip joint, this is considering the Trunk to be relatively fixed and the Leg (Femur) being able to move.
From the above observations a muscle can only pull. The proximal end of the muscle attaches to the front of the Lumbar Spine and the distal end attaches to the Lesser Trochanter on the Femur.

So? 
Well if the upper body is fixed then the action of the muscle is to pull the Femur upward towards the torso and cause it to rotate laterally (Knee out) at the same time.

If this 'group' of muscles is then tight, the Femur will favour being drawn up and rotated, just like sitting on a chair with one foot on the knee of the other leg (legs crossed).

A consequence of this is that the muscles that are primarily involved in Lateral Rotation of the Hip joint become tight too.

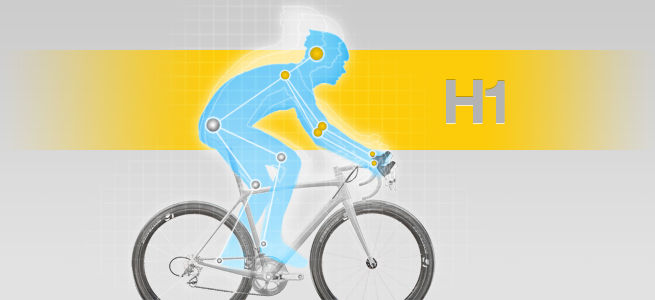
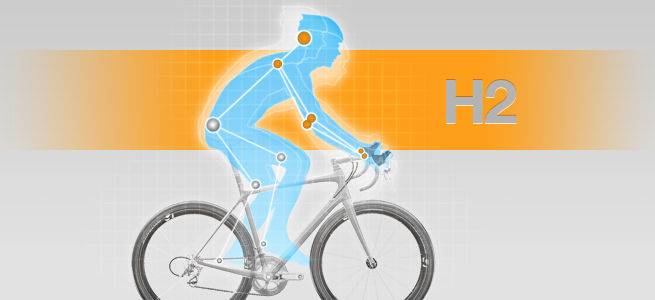
And finally, this leads to the knee moving up and out on the 'recovery phase' of the pedal stroke. Not unlike the left knee of the Cyclist in the image below.
The consequence of this?
Potentially, as the foot is attached to the flat platform of the pedal, the knee is forced to endure a rotation force as the Cyclist pushes down through the pedal to propel the bike forward.

How do we fix this?
Well... There are commonly two schools of thought on this we can either work to alleviate any symptoms or perform a bike bit and provide exercises. At fit-me-up a mix of the two is preferred depending on the needs and aspirations of the Cyclist, these are set by the Cyclist not the Fitter.

A typical approach would be;
  • Verbal and written history to establish a starting point and aim for the Cyclist.
  • An off-bike physical assessment
    • with feedback as to how movement patterns may influence the on-bike position
  • An on-bike warm up
  • An on-bike video session
    • with simultaneous front and side views taken
    • this is then assessed to get a base line for the Cyclist's position
  • The use of Retul measurements
    • these are taken from both sides of the Cyclist
    • together with all the information already learned this data is used to establish a starting point for any bike adjustments
  • After each adjustment the comfort of the Cyclist is checked and the Retul data is obtained for both sides of the Cyclist.
  • This process continues for the duration of the fitting, with a check being taken after each adjustment.
  • Finally, a further video is taken to assess the changes visually
    • this may also be done part way through the procedure to check on progress as required
  • At this point, when the aim has been to arrive at a more desirable fit a full review is carried out.
For some Cyclists this can be a relatively rapid process only taking a couple of hours, though for some with more involved instabilities or injuries, the 'Fit' can be the start with ongoing guidance to perform exercises or to make continued adjustments to the bike or both.

Each Cyclist is individual and so are their issues and it follows that then so are the solutions to those needs.

For more information please contact me at info@fit-me-up.com


Happy Miles

Dean